Shop Messages: The Secret to Polished Product Photos and Professional Branding
Is your online shop in need of some sprucing up? You might have the best products in the world, but if your visual presentation feels cluttered or inconsistent, potential customers may scroll right past you. This is where Shop Messages come into play. These cute little graphics go right on top of your product pictures to display messages directly to your customers, acting as a visual bridge between your inventory and your buyer's needs. Whether you are a seasoned entrepreneur or just starting your first Etsy store, understanding how to leverage these overlays can transform a amateur-looking listing into a professional storefront.
However, simply downloading a pack of graphics isn't a magic wand. Many creators make the mistake of assuming that adding more elements automatically equals better design. In reality, poor application of shop overlays can clutter your images, obscure product details, and confuse your audience. To get the most out of tools like the Shop Overlays Set, you need to approach them with a strategy focused on clarity and brand cohesion.
Common Pitfalls When Using Shop Overlays
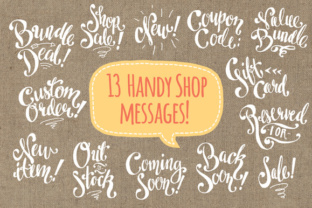
One of the most frequent misunderstandings involves the expectation of text editability. A crucial detail often overlooked by beginners is that in many high-quality hand-drawn sets, no fonts are used. Everything is drawn by hand, which means the text within the graphic is not editable like a standard Word document. If you purchase a set expecting to type "Sold" into a pre-made box and have it instantly appear in your font, you will be disappointed. Instead, these are designed as complete artistic elements. The solution is to choose the message that best fits your need from the included options—such as Custom listing, Reserved for, or Out of Stock—or use the layered files to customize colors while accepting the hand-lettered style as part of your brand's charm.
Another error creators make is ignoring resolution and file formats. Uploading a low-resolution image to a high-traffic marketplace can result in pixelated, blurry graphics that scream "unprofessional." When evaluating a download, always check the DPI (dots per inch). A quality set should offer files at 300dpi, ensuring crisp lines whether printed or viewed on high-definition retina screens. Furthermore, relying solely on flattened JPEGs limits your flexibility. If you want to change the color of a "Sale" banner to match your seasonal theme, a flat image won't help. You need access to fully layered .PSD files or vector versions to make those adjustments efficiently.
Missteps in Placement and Composition
Even with the right files, placement matters. A common mistake is covering vital parts of the product photo. An overlay saying "Gift card" is useless if it hides the actual design of the card you are selling. Always treat these graphics as accents, not obstructions. They should guide the eye, not block the view. Before finalizing an image, step back and ask if the message is legible without compromising the product's visibility.
Additionally, inconsistent usage across your shop can dilute your brand identity. Using a whimsical, hand-drawn "Vacation" sign on one banner and a stark, corporate-style "Closed" graphic on another creates a disjointed experience for the shopper. Stick to a single cohesive set. The Shop Overlays Set typically includes a variety of messages like Coupon codes and sales announcements that share the same artistic DNA, ensuring your shop banner and individual listings feel like they belong to the same business.
Maximizing Value Through File Versatility
To truly elevate your workflow, you must understand the different file types included in premium packs and when to use them. A robust collection usually provides three distinct formats: raster images (PNG), layered Photoshop files (PSD), and vectors (AI). Ignoring any of these limits your creative potential.
- PNG Files: These are your go-to for quick updates. With transparent backgrounds, you can simply drag and drop a 52 PNG set onto your photograph. They are perfect for users who aren't comfortable with complex editing software but still want a polished look.
- PSD Files: For those who want control, the 26 fully layered PSD files are invaluable. These allow you to toggle visibility, adjust blending modes, and recolor elements using smart objects. This is essential when you need a specific shade of blue to match your logo rather than the default black or white.
- Vector Files: Often overlooked by non-designers, vector files (like the included AI file) are the gold standard for scalability. Because they are mathematically defined paths rather than pixels, they can be resized infinitely without losing quality. If you plan to use these graphics for large-format printing or massive website headers, always start with the vector version.
Many users also forget about the included Photoshop brushes. These allow you to "stamp" elements onto anything with a single click, speeding up the process of marking multiple items as "Reserved" during a busy sales period. Failing to install and utilize these brushes means doing more manual work than necessary.
Strategic Applications Beyond Product Photos
While the primary use case is placing a PNG image over a photograph, limiting these assets to just product listings is a missed opportunity. Smart sellers use them in their shop banner design to create dynamic announcements. Imagine a banner that clearly states you are on vacation but will be back soon, styled perfectly to match your shop's aesthetic. This manages customer expectations immediately upon arrival.
Furthermore, these graphics serve as excellent tools for social media marketing. When advertising a flash sale on Instagram or Pinterest, overlaying a "50% Off" graphic onto a lifestyle shot of your product can increase click-through rates. The key is consistency; use the same style of overlay across all platforms so your audience instantly recognizes your brand voice.
What to Check Before You Download or Buy
Before committing to a specific set of shop messages, perform a quick audit of your current technical setup and design needs. First, verify your software capabilities. If you do not own Adobe Photoshop or Illustrator, ensure the pack includes high-quality PNGs that you can use in free alternatives like Canva or GIMP. Second, consider your volume of sales. If you frequently create custom orders, a set with diverse "Reserved for" and "Custom Listing" tags is non-negotiable. If you rarely run sales, prioritize sets with strong informational tags like "Out of Stock" or "Back Soon."
Finally, look for organization. A disorganized download folder wastes time. Quality packages come with files that are organized, layered, and labeled for ease of use. You should be able to find the "Small Black" version of an overlay as easily as the "Large White" one. Time spent searching for files is time taken away from fulfilling orders and engaging with customers.
By avoiding these common pitfalls and leveraging the full range of features—from hand-drawn aesthetics to editable vectors—you can ensure your online shop looks inviting, professional, and trustworthy. Remember, the goal of Shop Messages is to communicate clearly and beautifully. When used correctly, they don't just decorate your photos; they facilitate sales and build a stronger connection with your audience.